 I am going to give you the exact instructions on how to upgrade your WordPress website to SSL in under 3 hours AND in just 10 easy steps.
It’s 2020 and you are falling behind the competition if your WordPress website is not HTTPS/SSL! If you’re still not convinced, here are 5 great reasons your site should be HTTPS.
“But wait,” you ask. “I’ve heard that a WordPress SSL conversion takes tons of research and planning.”
Table of Contents
- Introduction
- Get Your SSL Certificate
- Install Plug-Ins
- Update Static HTTP Links
- Disable Caching Plug-In
- Update WordPress to HTTPS
- Do Search/Replace
- Test Your HTTPS Site
- Update Google Search Console
- Update Google Analytics
- Re-Directs In HTACCESS
- Implement HSTS
- Update Links
- Conclusion
- Social Likes After HTTPS
- Fixing SSLv3 POODLE Error
Well, while there are many facts and myths about HTTPS, one fact is that it does take tons of research and planning. But, the actual “doing” doesn’t take long at all.
You see, I’ve done the research and planning for you. You simply need to “do the doing”.
If you follow this post to the letter, you should have your website up and running on HTTPS in less than 3 hours (some visitors have even reported a 1 hour completion time).
The time is now — Google is branding all non-HTTPS sites as “Not Secure”.
I would recommend that you perform this HTTPS/SSL WordPress upgrade during a period that is not a peak traffic time, such as off-hours and/or the weekend.
Now, let’s get started. After step 1 (in which you attain your SSL certificate), you will be fully HTTPS within 3 hours. NOTE: As with any website modification, you will want to have a full backup and restore procedure in place before making these changes.
Step 1: Get Your SSL Certificate
It’s time to get the much-hyped SSL certificate that will enable HTTPS on your website. Is this process difficult/challenging?
Absolutely not. However, you do want to perform this process a few days before you do your HTTPS migration. (This is recommended but not mandatory. As you see below, Hostgator got our certificate installed in 1 hour.)
I use HostGator as my hosting company and the process could not have been any easier. You simply go to https://www.hostgator.com/ssl and request one.
Your main decision at this point is: What type of certificate do you want to choose?
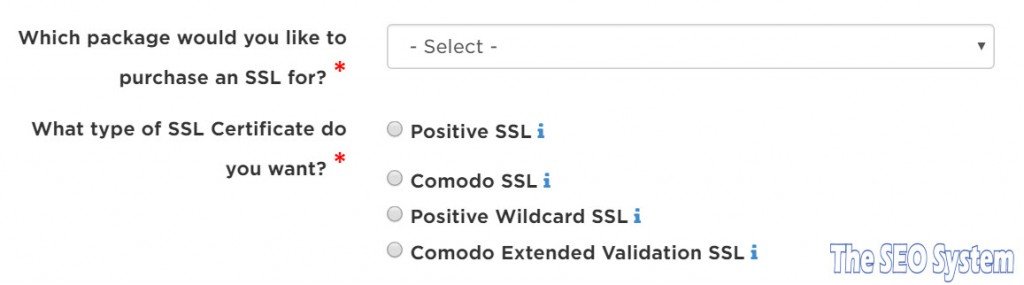
This HostGator page has definitions of the various certificates. For the SEO system, we simply chose the Positive SSL Domain Validated certificate (which runs about $40 per year but just $20 for the first year). It works great and looks like this in the browser (though the HTTPS part is no longer green).
![]()
If you are a large organization and have an overwhelming need to demonstrate an advanced level of security (like an online banking or e-commerce site), you will want to go with the Extended Validation SSL certificate. This will take a lot longer (perhaps a few weeks) as they validate lots of corporate information. Here is what users see in the browser if you have the Extended Validation SSL certificate:
![]()
![]()
I would recommend that you get your certificate from your web hosting provider as they will install it for you and you’ll be good to go. You may find a less expensive certificate with an independent provider but you’ll have more issues installing it. Thus, my recommendation is to go with your web host.
How long did it take HostGator to get the certificate installed for The SEO System? Just one hour and we were up and running!
So, what did that SSL certificate installation actually do?
The cerfiticate is what enables HTTPS on your site. Though you haven’t performed the steps to fully migrate, your site is now accessible via HTTPS…but don’t tell anybody yet because your site, accessed through HTTPS, will be full of errors. Let’s get that remedied.
Step 2: Install Plug-Ins You May Need Before Your WordPress SSL Conversion
There are two WordPress plug-ins that I recommend installing prior to your WordPress HTTPS migration.
The first one is the “magic bullet” called Better Search Replace. This will allow you to change all HTTP links to HTTPS. It’s a goldmine. Go install it now.
The second is called SSL Insecure Content Fixer. I dont’ think you’ll need this one but it’s a possiblity — better to have it and not need it…you know the rest. Go install that now.
Step 3: Identify and Modify Static HTTP Links
This is the area where many folks struggle.
Why?
Because if you have any photo/video embeds on your site that use HTTP instead of HTTPS and you do not fix them, your site will not be fully HTTPS and it will probably throw-up (gross!) errors to your visitors.
NOTE: Area of confusion for some — You can still link to a non-HTTPS site but you cannot embed content (like a photo) from an HTTP site. Eg. You may find old YouTube or SlideShare embeds that are non-https.
So, where will you find static HTTP links on your WordPress site?
There are usually 3 offenders (and perhaps a 4th):
1.) Your widgets: You will want to go through your widgets to identify any embeds that may use HTTP. For example (as you see on the top right of this page), we use a photo just above our “Start Your Membership Now” section. That had to be changed to HTTPS.
2.) Your Footer: You may have some static HTTP links in your footer. If so, go change those to HTTPS now. (In our case, the footers are implemented as widgets so #1 covered us.)
3.) Your Menu System: If you added any static pages to your menu system, go change those to HTTPS now.
4.) Your Theme: You will read this time and again in other articles. Check your theme…it may have lots of static HTTP references. None of the themes that I have worked with have had any issues with this so it’s probably a non-issue so don’t spend much time with it.
You don’t need to take an inordinate amount of time doing this (spend no more than 30 minutes). Updates can be made later but it’s good to tackle what you can now.
Step 4: Disable Your Caching Plug-In
Most WordPressers are using some form of caching, normally WP Supercache or W3 Total Cache. Whichever is your pleasure, go disable it now.
We’ll need to see things in real time and ensure that we are not dealing with cached version of pages.
Step 5: Converting WordPress HTTP to HTTPS
Ok, this is the big step.
Why?
Because we are about to change all of your WordPress from HTTP to HTTPS!
But wait, before we do this, make sure you know your WordPress admin password. You need to do this because, once we make this change, your default address will begin with HTTPS (considered a different webpage by your browser) and WordPress may not remember your password.
“Who me?”
“Yes, you…and me too.” Many of us have our passwords cached and may not have the password immediately accessible. But, you’ll need it before this step so make sure that you know what it is.
Now, off we go. In your WordPress Admin console, go to the Settings > General tab and change your WordPress Address (URL) and your Site Address (URL) to https as you see in the photo below (don’t put a trailing slash after .com or whatever your domain extension happens to be):

Click “Save Changes” at the bottom of this page.
Now, all of your links are HTTPS.
Step 6: Do Better Search Replace
In step 2, we installed the Better Search Replace Plugin. Now, we are going to use it to ensure that we are a complete WordPress SSL website.
Why?
The main reason is that you will have a lot of embedded links (usually photos) that are still in the HTTP format. And, with embedded HTTP content, your WordPress site will not be fully HTTPS (which means the browser bar will not be green and users may receive errors that your site is not fully secure — often referrred to as “mixed content errors”.).
In this step, we are going to change all of these HTTP references to HTTPS in one fell swoop.
Let’s do this: Visit your WordPress Admin panel > Tools > Better Search Replace to bring up the plugin interface that you see in the photo below:
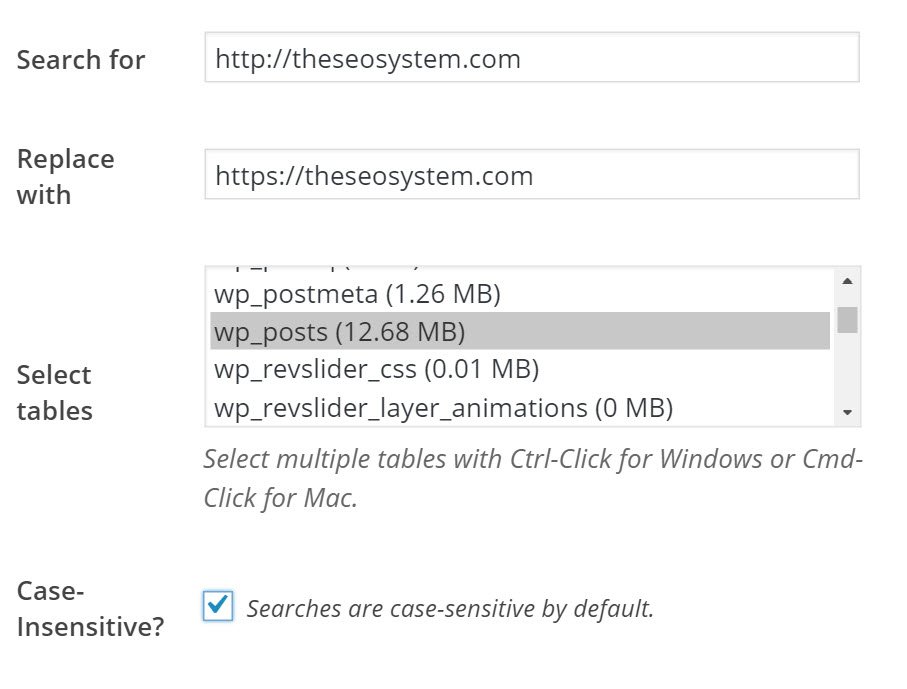
Now, next to “Search For”, enter your domain with the HTTP: (Eg. http://yourdomain.com OR if you use www with your domain, enter http://www.yourdomain.com)
Next to “Replace with”, enter the exact same thing but use HTTPS instead of HTTP.
In the “Select tables” tab, we want to choose wp_posts as you see in the photo. (In one conversion I did, we also needed to do a Search/Replace in the wp_comments table. When we do testing later, if you see mixed content errors in the comments section, you can come back to this step.)
Next, select “Case-Insensitive” so that you will change references regardless of capitalzation.
I leave the Replace GUIDs unchecked.
Finally, if you want to take a trial run, click the “Run as dry run” box. This will not make any changes; it will simply show you how many changes are going to be made (and also try to upsell you on purchasing the product to see the exact changes).
Once you’re all set, click the “Run Search/Replace” button to switch all links to HTTPS.
You have just changed every reference on your website to HTTPS at one time —You have taken WordPress HTTP to HTTPS!
Believe me, I have seen people trudging through every post to do the same thing. This is a true time saver.
Finally, if you see errors with other sites in testing (such as mixed content errors pointing to embedded content from http://youtube.com) , you can use this tool to switch all of those as well.
Step 7: Testing Your New WordPress SSL Site
Guess what? You’re nearly there!
Have we even approached the 3 hour mark yet? Probably not. Why’d you wait so long to upgrade your WordPress site to SSL/HTTPS and a full SSL for WordPress implementation?
Our next step is to find out what we’ve missed.
To do this, open WhyNoPadlock.com and enter your new HTTPS domain name: https://yourdomain.com. You want to see a message like the one below:
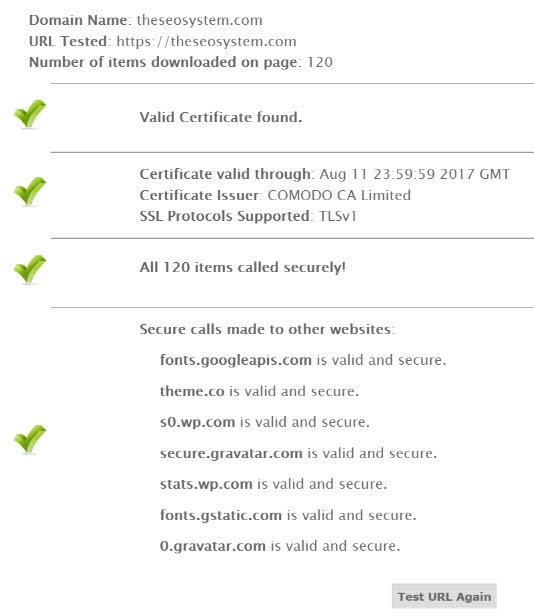
If you do not see this, WhyNoPadlock tells you exactly where the offending mixed content is. Go find the error(s) and fix them…except the “Force HTTPS” message — we tackle this in step #10.
After you have done this, we are still not sure that we are 100% WordPress SSL. Why? Because we need to check all of the pages beneath the homepage.
To do this, open https://www.jitbit.com/sslcheck/ and enter your HTTPS domain name. This page will search your site for mixed content messages. Ideally, you will see a message like the one below:
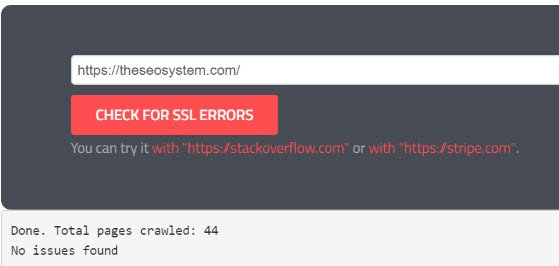
If this site finds errors on your pages, it will report the source page and you can go fix it.
If you have a lot of pages on your domain, this tool will not look at each of them — it is limited to 400 pages or less. However, it gives you a great idea of any remaining errors that you may have. If you’re still struggling with mixed content messages at this point, run the plugin we installed above called SSL Insecure Content Fixer. It usually can find and remedy mixed content issues.
Finally, let’s ensure to check the very important pages — the ones that the majority of your users visit. We’ll call them the top 10.
You probably know what the most heavily trafficked pages on your website are but, if not, check your stats. Next, visit those top 10 pages and make sure that the https padlock appears, as you see in the photo below:
![]()
If the bar is green on all of those, you’re doing awesome!
I’ll leave it up to you if you want to check every single page on your domain or not, but we’ve done some pretty solid checking. However, we’re not quite done. Let’s move on to Step #8.
Step #8: Set-up Google Search Console With HTTPS
Now that you’re all setup with HTTPS, you must tell the Google analysis tools about it.
First, let’s tackle the Google Search Console (formerly Webmaster tools). While the Google Search Console use to see your HTTP & HTTPS sites separately, it now allows you to add your domain just once (read more here). So, you will want to add your new site into the search console as you see in the photo below:
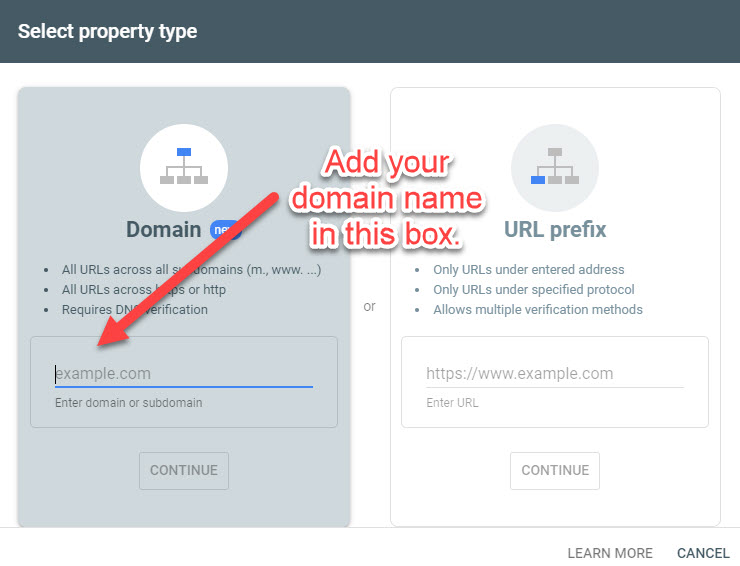
This will then prompt you to add a DNS txt record to verify domain ownership. Once validated, you will now be able to see all of your domain traffic in the Google search console whether it be HTTP or HTTPS.
If you would like to use this opportunity to have a clean looking Google Search Console (and not have several entries for one domain), you may want to delete other older properties that show up. Here are instructions on how to remove a property from the Google Search Console.
Now, you’ll want to add your new sitemap, which should have all of the new https:// content. Let’s check it first to make sure it all looks good. Since you are using WordPress, you likely either use the Google XML sitemaps plugin or the one that comes with WordPress SEO. The location of each sitemap, respectively, is: https://yourdomain.com/sitemap.xml or, for WordPress SEO, https://yourdomain.com/sitemap_index.xml.
It should look something like the photo below (we use the Google XML sitemaps plugin):
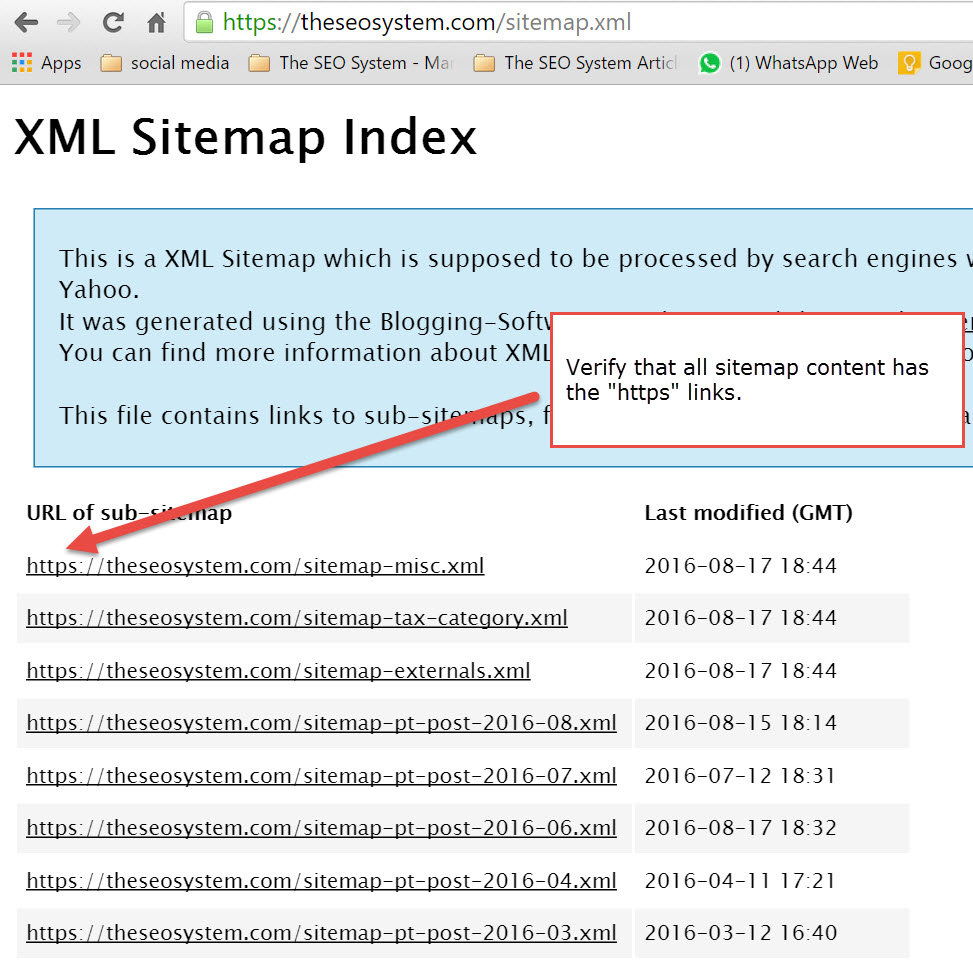
If all looks good, add the sitemap link in the Google Search Console by clicking on the Sitemaps link. It may take some time for your new sitemap to populate in the Google Search Console. To get the indexing ball rolling, you may also want to use the new Fetch as Google tool to add your new HTTPS homepage and all linked content.
Step 9: Setup Google Analytics
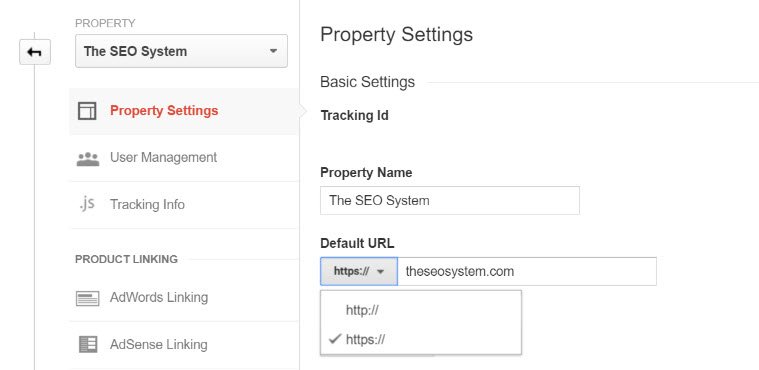
Google Analytics only requires one quick step after you have converted to HTTPS.
Within Google Analytics, click Admin | Property Settings | and find where it says “Default URL”. As depicted in the image below, you want to change this to HTTPS and save. You’re now good to go with your Google analytics.
Step 10: Modify .HTACCESS to Redirect all HTTP Requests
So, you think you have fully converted to HTTPS? Not so. Your site is still accessible via HTTP.
What should we do about that?
We want to 301 redirect all traffic that comes in via HTTP to HTTPS. This is another step to tell the world “We’re all HTTPS now!”
To do this, you will want to modify your .HTACCESS file (found in the root of your domain), with the following lines (in a Linux/Apache environment):
[sourcecode language=”plain”] RewriteEngine OnRewriteCond %{HTTPS} off
RewriteRule (.*) https://%{HTTP_HOST}%{REQUEST_URI} [R=301,L] [/sourcecode]
If you are a Windows users, or would like more information, read this post from HostGator. You can also test whether your 301 re-directs are working here.
Step 11 (Optional But Recommended): Implement HSTS – HTTP Strict Transport Security
At this point, you have modified your .HTACCESS file to redirect all requests to HTTPS.
Now, we want to take this a step further by implementing HSTS, which stands for HTTP Strict Transport Security.
If you would like to read more about this HTTPS security enhancement, I highly recommend this article where we read: “[HSTS] is basically like a 301 redirect, but at the browser level, rather than the webpage level. It is superior to a 301 redirect as it can be implemented to always only use https, whereas 301 redirects are actually unsecure when first seen by a browser.”
This step is not required but highly recommended as it will ensure that HTTPS is always implemented.
To implement HSTS, add the follwing to the top of your .HTACCESS file (for non-Linux/Apache environment, visit the article above):
[sourcecode language=”plain”] <IfModule mod_headers.c>Header set Strict-Transport-Security “max-age=10886400; includeSubDomains; preload”
</IfModule>
[/sourcecode]
Then, visit this website and add your domain to the “preload” list.
Step 12 (Optional — If Time/Resources Are Available): Update Links to Your New HTTPS Website
You will find many authorities who will tell you to now contact all of the people who have linked to your website and ask them to update their link to the HTTPS version.
I only recommend this if you have the time and resources available. Imagine contacting every single inbound link? That could take F-O-R-E-V-E-R and is probably not worth your time. If you want to do this, but on a limited scale, try to contact the most important 5 or 10 inbound links that you have.
What I do recommend is visiting all of the links that you control (like your social media sites) and updating the links there to point to your new HTTPS site.
Conclusion: Is Your WordPress HTTPS/SSL Upgrade Done?
You have endlessly encountered articles about how important it is to upgrade your WordPress website, or any website, to HTTPS. They all say things like:
“You’ll site will be more secure!”
“Your site will perform better in the search engines!”
“Your visitors will be more inclined to return to the site!”
Now, guess what? You’re done!
Your site is now fully HTTPS. Remember to reactivate your caching plugin (and remove the two plugins we added earlier).
How long will it take for Google and other search engines to start indexing your HTTPS content? The good news is…they have already begun to index your HTTPS content if you have followed the procedures above. Based on my experience and the size of your website, your HTTPS content should be fully indexed within 1-3 weeks.
And during that time (before your HTTPS content is fully indexed), your currently indexed HTTP content will automatically redirect to the proper HTTPS content since we implemented proper 301 redirects and HSTS.
Now, I’d love your feedback on this article. Were you able to complete your HTTPS upgrade in under 3 hours? Did it take you less time/more time? Was it easy? Can you help me improve this article with your personal experiences?
As always, I’d love your feedback in the comments below.
Thanks and congrats on your new HTTPS site!
Appendix A: What Happens to Social Shares After I Switch To HTTPS?
Currently, I have seen that LinkedIn post likes will transfer immediately. The others will not, at least not immediately.
If you would like to maintain all previous post “likes”, I recommend checking out this plugin, which essentially adds your previous likes to your new likes to get the true number of post likes/shares.
Appendix B: Server Supports SSLv3, Vulnerable to POODLE Attack Error Message
In certain circumstances, WhyNoPadLock may give you an error that says “Server Supports SSLv3, may be vulnerable to POODLE attack. It is suggested to disable the SSLv3 Protocol.”

Our default HostGator implementation produced this error.
Our solution was simple. We simply contacted HostGator to let them know of this error. They responded with the message below:

This caused the SSLv3 POODLE vulnerability to disappear. If you operate your own server, the solution is to disable SSLv2 & SSLv3 and you’ll be all set.

As Founder of The SEO System, Richard delivers strategic consulting and builds high-performing teams that drive measurable growth, search authority, and long-term search equity.
Richard is currently accepting select clients for SEO and AEO consulting. Learn more at https://richardcummings.info/consulting.html
- The AI Inconsistency Gap: Why Your Brand is Winning on Google but Losing the “Answer War” - February 26, 2026
- The Personal Assistant Pivot: Optimizing for AI Search and AEO in 2026 - February 26, 2026
- The Ultimate Guide to Dental SEO: How to Rank Higher & Attract More Patients - March 10, 2025